- التسوق ، اصبح سهلا.
- /
- احصل على التطبيق!
Installation Steps:
1. Loosening the Seal Gland: Turn the outboard hard to port; place the pin wrench (supplied in the seal kit) in the holes of a gland, and use a 5/8-inch box wrench on the nut on the port end of the piston rod. Turn counterclockwise on the pin wrench with opposite pressure on the box wrench to loosen the seal gland.
2. Removing the Support Bracket: Use a 3/4-inch socket wrench to remove the nut and washer securing the support bracket to the support rod. Do the same to the piston rod nut and washer. Use wrenches on the opposite ends to keep the rods from turning. With hardware gone, pull off the support bracket.
3. Removing the Old Seal Gland: Finish unscrewing the old seal gland. If you can't grip it well with your hand, use the pin wrench. Slide it off the piston rod.
4. Installing the New Seal Gland: Place the tapered guide tool from the kit on the end of the piston rod and lubricate it and the piston rod well with oil or grease. Carefully slide the new seal gland over the guide and onto the piston rod until it reaches the cylinder. Screw the seal gland into the cylinder, but don't tighten it yet. Remove the guide tool. (it is not part of the final assembly, but you will need it for the other side.)
5. Reinstalling the Support Bracket: Reconnect the support bracket to the support rod and piston rod and replace the washers and nuts, tightening the nuts against the washers. You may need to use wrenches on the opposite nuts to tighten sufficiently.
6. Tightening the New Seal Gland: Use the pin wrench to tighten the new seal gland while using a 5/8-inch box wrench on the end of the piston rod for counter torque.
Package Included:
1 x Steering Support Bracket Puller.
1 x Bleed Filler Kit with Bridge Tube and Screw Cap.
1 x HS5157 Hydraulic Outboard Seal Kit (2 x Seal Gland, 1 x Pin Wrench, 1 x Seal Gland Assembly Guide Tool, 8 x "O" Ring)
Note:
Please read all descriptions & fitment before ordering the product.
Please allow 1-3mm differences due to manual measurement. Due to the different display and different light, the picture may not reflect the actual color of the item.
Professional installation is highly recommended (No Instruction Included)
It would be highly appreciated if you might contact us first if you have any problems concerning the items. And you can expect all the issues would be resolved ASAP!
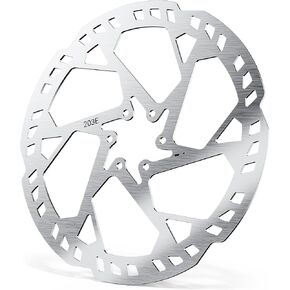 شاقة 203 مم دوار قرص الفرامل الخلفي من الفولاذ المقاوم للصدأ من الفولاذ المقاوم للصدأ من أجل النحل الخفيف/surron/sur-ron/sur ron x/sur ron s/x160/x260
KWD 11.500
شاقة 203 مم دوار قرص الفرامل الخلفي من الفولاذ المقاوم للصدأ من الفولاذ المقاوم للصدأ من أجل النحل الخفيف/surron/sur-ron/sur ron x/sur ron s/x160/x260
KWD 11.500
 ذروة تصميم فرامل الدراجات النارية/القابض: قفل مع slimlink (عدم الشحن)
KWD 41
ذروة تصميم فرامل الدراجات النارية/القابض: قفل مع slimlink (عدم الشحن)
KWD 41
 غلاف روك روك 4x حشيات 11061-1285 11061-7083 متوافق مع Kawasaki FR651V-AS17 FR651V-AS18 FS730V-AS00 FS730V-AS10 FX600V-ES00 FX651V-DDS10
KWD 4
غلاف روك روك 4x حشيات 11061-1285 11061-7083 متوافق مع Kawasaki FR651V-AS17 FR651V-AS18 FS730V-AS00 FS730V-AS10 FX600V-ES00 FX651V-DDS10
KWD 4
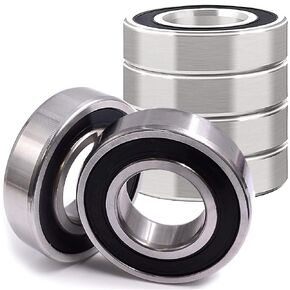 3 مجموعات محامل إعادة بناء المغزل C3 Premium لـ Hustler 605380 125981 - محسّن C3 Design Fastrak SD SDX Raptor SDX 48 "54" 60 "DECK
KWD 17.500
3 مجموعات محامل إعادة بناء المغزل C3 Premium لـ Hustler 605380 125981 - محسّن C3 Design Fastrak SD SDX Raptor SDX 48 "54" 60 "DECK
KWD 17.500


