- التسوق ، اصبح سهلا.
- /
- احصل على التطبيق!
How to determine My Yamaha Golf Cart Model? 𝐇𝐨𝐰 𝐭𝐨 𝐢𝐧𝐬𝐭𝐚𝐥𝐥 𝐠𝐨𝐥𝐟 𝐜𝐚𝐫𝐭 𝐟𝐞𝐧𝐝𝐞𝐫 𝐟𝐥𝐚𝐫𝐞𝐬? Test fit fender flare to bodywork to determine best placement. Keep in mind our flares have notches in them to accommodate for the rocker panels and the contour of the body. Holding the fender flare in place, mark locations to be drilled using a marker. For Stainless Steel hardware, Drill first hole using a ¼ ” drill bit. Ensure area behind body work is clear. For Self-Tapping Screws, Drill a pilot hole using a 1/8” drill bit. Ensure area behind body work is clear. Install the first fastener to secure fender flare. Check other marked holes to ensure proper placement before drilling. Once sure of placement, remove fender flare out drill other holes Install the mounting hardware and repeat the process on the other three fender flares. NOTE: WE OFFER TWO DIFFERENT TYPES OF MOUNTING HARDWARE. PLEASE NOTE THERE ARE DIFFERENCES IN HOW THEY ARE INSTALLED. Each fender flare is marked relative to where it is to be mounted. This can be found on the inside of the fender flare.
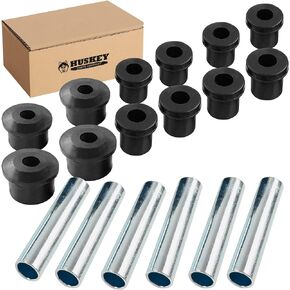
 طقم جلبة من الأمام السفلي للربيع والأمامية العلوية على شكل حرف A من Huskey Club مزود ببطانات يوريتان 12X، أكمام 2X للربيع الأمامي، 2X كم ملفوف داخلي، 2X كم ملفوف خارجي
KWD 8.500
طقم جلبة من الأمام السفلي للربيع والأمامية العلوية على شكل حرف A من Huskey Club مزود ببطانات يوريتان 12X، أكمام 2X للربيع الأمامي، 2X كم ملفوف داخلي، 2X كم ملفوف خارجي
KWD 8.500
 مجموعة جلبة كاملة من شركة Huskey Parts Company ذات أوراق الربيع الخلفية لعربة الجولف الكهربائية والغاز EZ-GO RXV 2008+ طقم جلبة التعليق الخلفي...
KWD 8
مجموعة جلبة كاملة من شركة Huskey Parts Company ذات أوراق الربيع الخلفية لعربة الجولف الكهربائية والغاز EZ-GO RXV 2008+ طقم جلبة التعليق الخلفي...
KWD 8
 مجموعة ضبط عربة الجولف هاسكي لسيارة النادي السابقة 2004-Up مع محرك كاواساكي FE350، تتضمن فلتر هواء، فلتر زيت، قابس شرارة NGK، مرشحات وقود 2X، محرك القابض وحزام مولد المبتدئين (انتقائي)
KWD 10.500
مجموعة ضبط عربة الجولف هاسكي لسيارة النادي السابقة 2004-Up مع محرك كاواساكي FE350، تتضمن فلتر هواء، فلتر زيت، قابس شرارة NGK، مرشحات وقود 2X، محرك القابض وحزام مولد المبتدئين (انتقائي)
KWD 10.500
 WHT009475 WHT001760 البوللي بتر بالعمود المرفقي WHT009475B استبدال Audi A1 A3 A4 A5 TT VW EOS Golf Tiguan Transporter
KWD 6.500
WHT009475 WHT001760 البوللي بتر بالعمود المرفقي WHT009475B استبدال Audi A1 A3 A4 A5 TT VW EOS Golf Tiguan Transporter
KWD 6.500


