- Shopping, made easy.
- /
- Get the app!
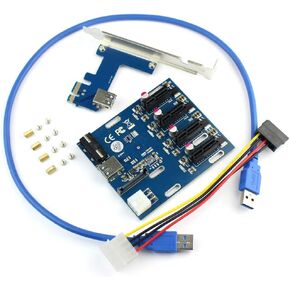
JMT ADT-M43SG M.2 NVMe M Key to PCIe4.0 X16 External Bracket 64Gbps Full Speed for Graphics Card Above 1660
Switches Detail:
SW1, Power Forced Start Switch, 1 for automatic startup, 2 for forced startup, please cut to 1 for automatic startup.
SW2, PERST # signal delay switch, 1 delay 2.2 seconds, 2 delay 4.5 seconds, with eGPU software, for graphics card compatibility optimization, the current software does not support, please cut to 1
SW3, CLKRUN # signal delay switch, 1 is closed, 2 is delayed for 9 seconds, with eGPU software, for graphics card compatibility optimization, the current software does not support, please cut to 1
J1, PERST # signal delay switch, OPEN to open delay function, SHORT to close delay function, the current software does not support, please insert the jumper cap SHORT.
J2, CLKRUN_Capacitance Delay, currently the software does not support, only for R&D engineers plug in capacitance adjustment delay testing. It takes about 2.2 seconds to insert a 1uF capacitor, 5 seconds to insert a 2.2u capacitor, and so on.
Installation Steps:
1. Install the hexagonal copper pillar and insert the graphics card into the PCIe x16 slot. The screw is tightened so that the graphics card will not shake or fall off.
2. Install ATX power supply , including graphics card power cord should also be connected, after installed.
3. You can plug in the M.2 cable when the computer is off. After power on, the ATX power supply will automatically start the fan to turn. The system will recognize the card automatically. Please install the graphics card driver. The installation of the driving process may prompt the computer to restart.
4. finish.
 JMT 3 Ports Hidden Inside USB 3.0 to Expresscard 54mm USB3.0 Adapter Converter for Express Card Laptop Notebook PC
KWD 9
JMT 3 Ports Hidden Inside USB 3.0 to Expresscard 54mm USB3.0 Adapter Converter for Express Card Laptop Notebook PC
KWD 9
 JMT PCI-E 1x to 16x Riser Card PCI-Express 1 to 4 Slot PCIe USB3.0 Adapter Port Multiplier Miner Card for BTC Bitcoin Miner Mining (No Cable)
KWD 11.500
JMT PCI-E 1x to 16x Riser Card PCI-Express 1 to 4 Slot PCIe USB3.0 Adapter Port Multiplier Miner Card for BTC Bitcoin Miner Mining (No Cable)
KWD 11.500
 JMT PCIe 1 to 4 PCI Express 1X Slots Riser Card Mini ITX to External 4 PCI-e Slot Adapter PCIe Port Multiplier Card
KWD 16
JMT PCIe 1 to 4 PCI Express 1X Slots Riser Card Mini ITX to External 4 PCI-e Slot Adapter PCIe Port Multiplier Card
KWD 16
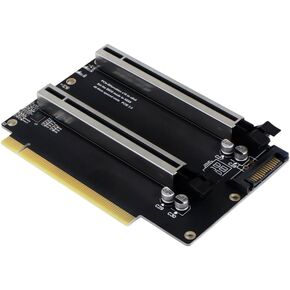 JMT PCI-E 4.0 x16 1 to 2 Expansion Card Gen4 Split Card PCIe-Bifurcation x16 to x8x8 with 20mm Spaced Slots CPU4P Power Supply Port
KWD 20.500
JMT PCI-E 4.0 x16 1 to 2 Expansion Card Gen4 Split Card PCIe-Bifurcation x16 to x8x8 with 20mm Spaced Slots CPU4P Power Supply Port
KWD 20.500


