- Shopping, made easy.
- /
- Get the app!
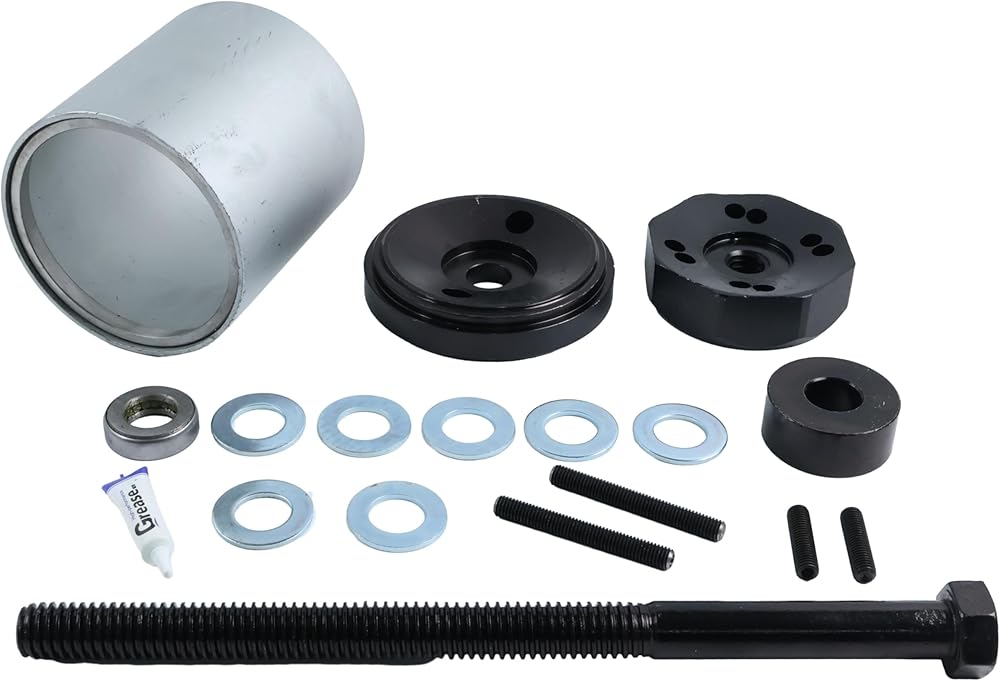
Cross Reference Number:
Replace for BWP HE9AA-T
Replace for Dayton 334-936
Replace forEuclid E-9575
Replace forHendrickson S-21307
Replace forMeritor R309575
Replace forSirco SH2034
Replace foriger Tool 15040
Applications:
Compatible with Automann TS TRB5912
Compatible with Dayton TS 334-1576
Compatible with Euclid TS E-10729A
Compatible with Flagg TS HT245
Compatible with Gaff TS 13628
Compatible with Hendrickson TS S-24691
Removal of Bushing:
1. Draw the direction of the lining on the crossbeam tube and compression tube. When disassembling, the spring pin does not need to align with the bushing hole.
3. Tighten the fixing nut to eliminate looseness. Tighten the hammer adapter to prevent the liner from getting stuck. Connect the hydraulic system and start the disassembly operation.
4. After completing a 2-inch stroke, tighten the nut again to eliminate looseness. (Most bushings need to be adjusted 3-4 times)
Installation of Bushing:
1. Lubricate the liner and insert it into the compression cylinder.
2. Place the plunger on the liner and align the mark on the liner with the mark on the plunger. When installing the liner, the four pins corresponding to the type of liner should be inserted into the liner.
3. Tighten the fixing nut to eliminate looseness. Tighten the hammer adapter to prevent the liner from getting stuck. Confirm that the markings on the plunger and crossbeam tube are aligned, and that the pin is still engaged in the bushing.
4. After completing a 2-inch stroke, tighten the nut again to eliminate looseness. Before and during use, ensure that the threads on the tool are well lubricated to prevent damage to the threads.
 -20%
Buffer Polisher, Powerful Buffer Waxer, 7-Speed Rotary Polisher with 6" and 7" Backing Plate, 1580W Rotary Polisher for Car Polishing, Waxing, Glaze, Sanding
KWD 21.500
-20%
Buffer Polisher, Powerful Buffer Waxer, 7-Speed Rotary Polisher with 6" and 7" Backing Plate, 1580W Rotary Polisher for Car Polishing, Waxing, Glaze, Sanding
KWD 21.500
 TCP Global Complete 3 Pad Buffing and Polishing Kit with 3-8" Pads; 2 Waffle Foam and 1 Wool Grip Pads and a 5/8" Threaded Polisher Grip Backing Plate
KWD 12.500
TCP Global Complete 3 Pad Buffing and Polishing Kit with 3-8" Pads; 2 Waffle Foam and 1 Wool Grip Pads and a 5/8" Threaded Polisher Grip Backing Plate
KWD 12.500
 AC Service Tech, LLC HVAC Quick Reference Cards for Refrigerant Charging and Troubleshooting
KWD 11.500
AC Service Tech, LLC HVAC Quick Reference Cards for Refrigerant Charging and Troubleshooting
KWD 11.500
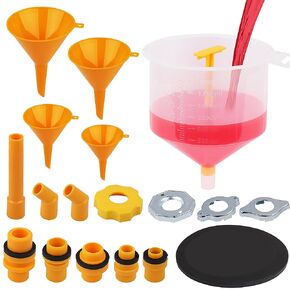 Ultimate No Spill Coolant Funnel Kit - 19-Piece Spill-Free Radiator Funnel Set, Spill Proof Radiator Bleeder Kit, Coolant Filling, Radiator Filler, Extra Funnels and Adapters for Universal Vehicle
KWD 7.500
Ultimate No Spill Coolant Funnel Kit - 19-Piece Spill-Free Radiator Funnel Set, Spill Proof Radiator Bleeder Kit, Coolant Filling, Radiator Filler, Extra Funnels and Adapters for Universal Vehicle
KWD 7.500