- التسوق ، اصبح سهلا.
- /
- احصل على التطبيق!
FOLLOW THESE STEPS WHEN BATTERY IS OUTSIDE VEHICLE. 1. check polariy of batery terminals. The POSlTvE (POS, P, +) batery terminal usually has a larger diameter than the NEGATIVE NEG, N, -) batteny termina. 2.) Attach at least a 24-inch-long 6-gauge (AWG) insulated battery cable to NEGATIVE (NEG, N, -) battery terminal. 3., Connect POSITlVE (RED) battery clamp or eyelet terminal connector from battery charger to POSITIVE (POS, P. +) battery terminal. 4.) Postion yourself and free end of cable as far away from batery as possibile - then connet NEGATVE (BLACK battery clamp or eyelet terminal cannector to free end of cable 5.) Connect the battery charger into a suitable electrical outlet. Do not face the battery when making this connection. 6.) When discomnecting charger, always do so in reverse sequence of connecting procedure and break first connection while as far away from batery as practica. 7.) A marine (lboat batiery must be reroved and charged on shore. To charge it on board requires equipment specially designed for marine use. Begin Charging. 1.) Verify the voitage and chemistry of the battery. 2.) Canfirm that you have connected the battery clamps or eyelet terminal connectors properly and the AC power plug is plugged into an electrical outet 3.) First time use The charger wil begin in Standby mode, indicated by an orange LED. In Standby, the charger is not providing any power. 4) Press the mode bufton to toggle to the appropriate charge mode (pres and hold for three seconds to enter an advanced charge mode) for the voltage and chemistry of your battery. 5.) The mode LED williluminate the selected charge mode and the Charge LEDs wlliluminate depending on the heath of the batery indicating the charging process has started. 6.) The charger can now be left connected to the battery at all times to provide maintenance charging. Auto-Memory: The charger has buit in auto-memory and wilreturn to the last charge mode when conected. To change modes after the first use, pres the mode Dutton.
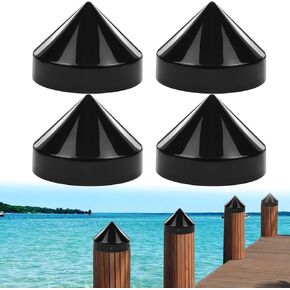 8 بوصة مخروط مخروطي قبعة من قفص الاتهام البحري ، غطاء مركبة لرؤوس القطب بعد أنبوب القطب ، قبعات غلاف قفص الاتهام للقارب البحري ، الأرصفة العائمة ، الأرصفة ، الأسود
KWD 6
8 بوصة مخروط مخروطي قبعة من قفص الاتهام البحري ، غطاء مركبة لرؤوس القطب بعد أنبوب القطب ، قبعات غلاف قفص الاتهام للقارب البحري ، الأرصفة العائمة ، الأرصفة ، الأسود
KWD 6
 -12%
Bayite 12V DC مضخة المياه العذبة 7.5 لتر/دقيقة 2 GPM 100 رطل 12 فولت الحجاب الحاجز مضخة بخاخة الرشاش
KWD 15
-12%
Bayite 12V DC مضخة المياه العذبة 7.5 لتر/دقيقة 2 GPM 100 رطل 12 فولت الحجاب الحاجز مضخة بخاخة الرشاش
KWD 15
 -11%
مجموعة موصلات سلك ختم 206pcs ، و 120pcs موصلات سلكي تقلص الحرارة و 86pcs 3: 1 محطات أنابيب مقاومة للماء والمعزولة للسيارات والسيارات
KWD 4
-11%
مجموعة موصلات سلك ختم 206pcs ، و 120pcs موصلات سلكي تقلص الحرارة و 86pcs 3: 1 محطات أنابيب مقاومة للماء والمعزولة للسيارات والسيارات
KWD 4
 يتضمن Gaahing Heavy-Duty Boat Dock Side Wumper ، واقي من الرصيف الكامل لتفادي الحماية من التركيب وحماية الرصيف ، مسامير التثبيت (أبيض ، 10 مساءً × 19.7 ")
KWD 32.500
يتضمن Gaahing Heavy-Duty Boat Dock Side Wumper ، واقي من الرصيف الكامل لتفادي الحماية من التركيب وحماية الرصيف ، مسامير التثبيت (أبيض ، 10 مساءً × 19.7 ")
KWD 32.500


