- Shopping, made easy.
- /
- Get the app!
Miter shears, an essential tool for making precise bevel cuts on decorative trim, offer clear advantages:
1. The beveled design allows the cutting edge to hug the workpiece tightly, leaving no excess burrs after cutting—no sanding required.
2. The concentrated cutting force ensures a clean break with a single snip, making them much faster than regular scissors.
3. Compact and lightweight, they fit easily into a toolbox or pocket for on-the-go use. No need to bring out a bulky miter saw.
4. Secure grip and precise cut control make them safer to use than forcing the material by hand, reducing the risk of injury.
Important Notice: Not suitable for cutting the following materials!
The trim cutter is specifically designed for precise cutting of soft materials, such as PVC, cork, rubber, leather, trim strips, cable channels, quarter-round molding, weatherstripping, and decorative trim. However, this product is not suitable for cutting the following materials:
1. All metals: including steel, stainless steel, hard aluminum, iron, and copper rods
2. Thick, hard panels / solid hardwood: thick solid wood, high-density fiberboard (HDF), plywood, hardwood blocks
3. Hard, brittle materials: ceramics, glass, stone, tiles, drywall
4. Thick or dense plastics: such as acrylic sheets or polycarbonate sheets
5. Thick rubber or heavy-duty industrial materials
Please ensure you use the bevel shears strictly within their intended scope of application.
Instructions:
1. Mark the cutting line with a pen.
2. Adjust the angle of the blade on the mitre shears according to the desired cut.
3. Place the material in the quarter round cutting tool and position it precisely, ensuring the cutting line aligns with the blade. (Place the material as close to the base of the blade as possible; avoid cutting with just the tip of the blade, as this requires less effort and prevents damage to the blade.)
4. Securely hold the material in place during cutting to prevent it from shifting; grip the handle firmly while cutting. (Apply even pressure; do not jerk or slam the tool.)
5. Release the handle and remove the cut material.
 Vertical Blind Repair Vane Savers, 12PCS Metal Vertical Blind Repair Tabs, Vertical Blinds Repair Kit for Vertical Blinds Replacement Slats
KWD 3
Vertical Blind Repair Vane Savers, 12PCS Metal Vertical Blind Repair Tabs, Vertical Blinds Repair Kit for Vertical Blinds Replacement Slats
KWD 3
 Curtain Magnets Closure with Adhesive for Blackout Curtains, Magnetic Curtain Clips to Hold Curtains Closed(12 Pair)
KWD 3.500
Curtain Magnets Closure with Adhesive for Blackout Curtains, Magnetic Curtain Clips to Hold Curtains Closed(12 Pair)
KWD 3.500
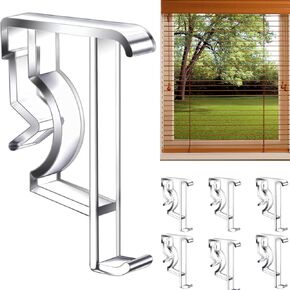 Blind Clips, 2 Inch Clear Valance Clips, 12 Pcs Valance Clips for Blinds, Blind Valance Clips for Wood or Faux Wood Horizontal Blinds Valance
KWD 3
Blind Clips, 2 Inch Clear Valance Clips, 12 Pcs Valance Clips for Blinds, Blind Valance Clips for Wood or Faux Wood Horizontal Blinds Valance
KWD 3
 -36%
JJFox DIY Tabletop Diamond Art Painting Kit,Double Sided Desktop Ornament Special Shaped Rhinestone Desk Placement Ornament,Home Stand Up 5D Gem Painting Craft Kit,Gift (American Puppy)
KWD 4.500
-36%
JJFox DIY Tabletop Diamond Art Painting Kit,Double Sided Desktop Ornament Special Shaped Rhinestone Desk Placement Ornament,Home Stand Up 5D Gem Painting Craft Kit,Gift (American Puppy)
KWD 4.500