- التسوق ، اصبح سهلا.
- /
- احصل على التطبيق!
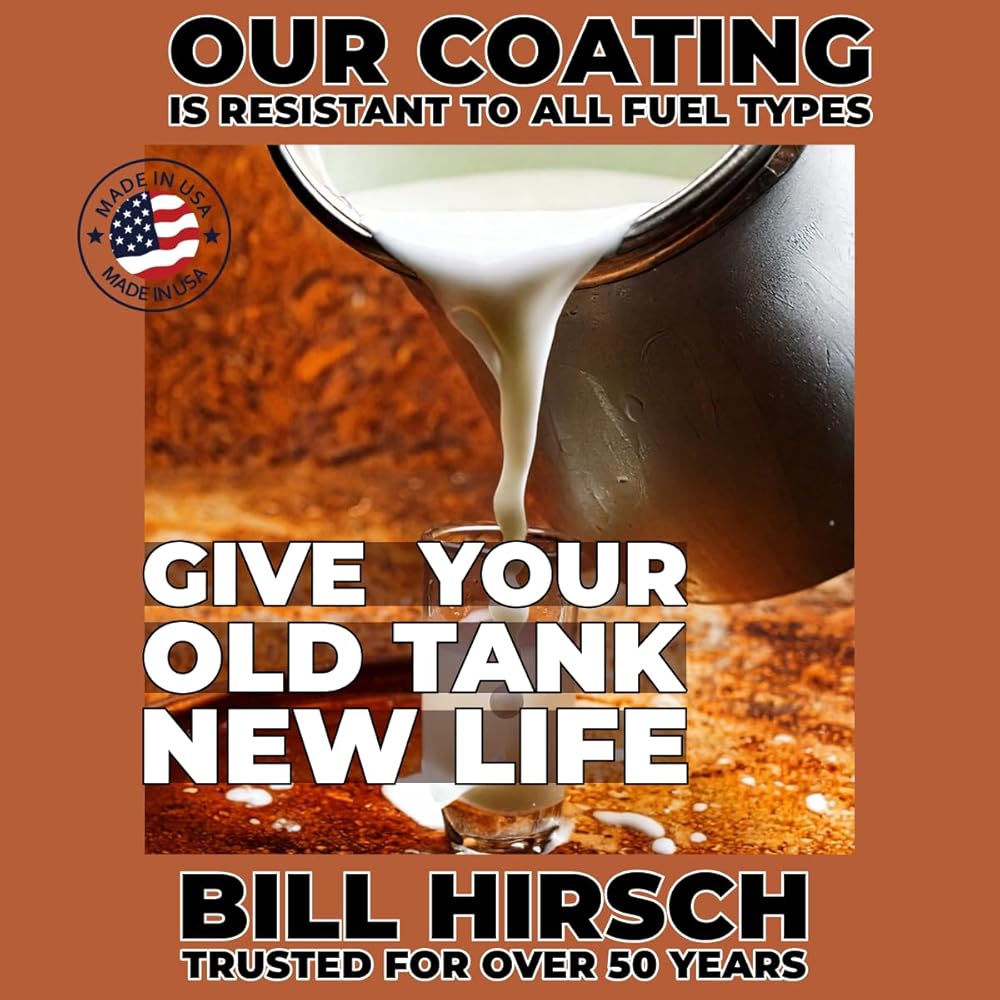
Bill Hirsch Fuel Tank Repair Kit – Restore Your Tank, Save the Day!
Revive Your Fuel Tank with Professional-Grade Results!
Say goodbye to rust, leaks, and costly replacements with the Bill Hirsch Fuel Tank Repair Kit. Trusted by auto enthusiasts and restorers for over 50 years, this all-in-one solution permanently seals and protects fuel tanks up to 30 gallons—perfect for cars, trucks, tractors, motorcycles and more. Whether you're restoring a classic ride or fixing a daily driver, this kit delivers lasting performance you can count on.
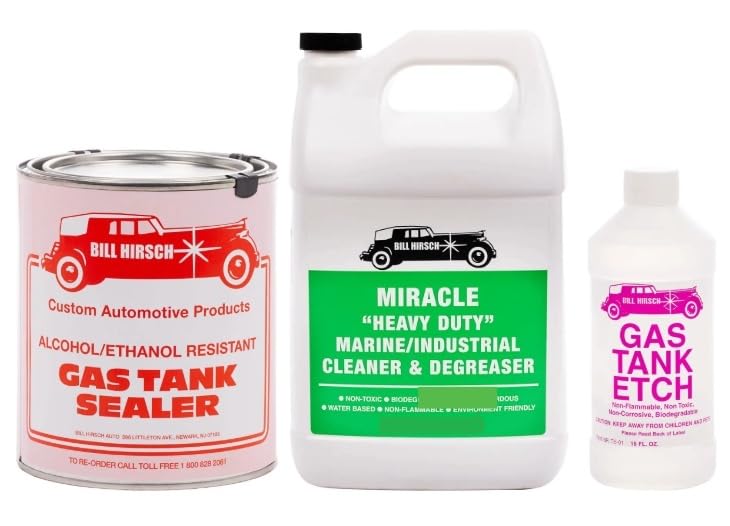
What's Inside:
1 Quart Cleaner/Degreaser – Strips away grease, grime and gummed up fuel
1 Pint Gas Tank Etch – Removes surface rust and preps for a flawless seal
1 Quart Alcohol/Ethanol-Resistant Sealer – Tough, durable coating that resists all fuels
Step-by-Step Instructions – Simple, clear guide for pro results
Why Choose Bill Hirsch?
Works on metal and most fiberglass tanks (not for 2-cycle mixed fuel tanks)
Stops rust in its tracks and seals pinhole leaks for good
Engineered by Bill Hirsch Auto, a leader in restoration products since 1975
DIY-friendly – no special tools needed, just follow the steps!
How It Works:
Clean, etch, seal—done! Slosh the sealer inside your tank for a tough, even coating that cures to perfection. Proper prep is key, and we've got you covered with everything you need in one kit.
Don't Replace—Repair!
Order the Bill Hirsch Fuel Tank Repair Kit today and get your vehicle back on the road fast.
Note: For best results, ensure tank is fully dry and rust-free before sealing. Not recommended for 2-cycle fiberglass tanks. Satisfaction Guaranteed – Restore with the Best
Directions
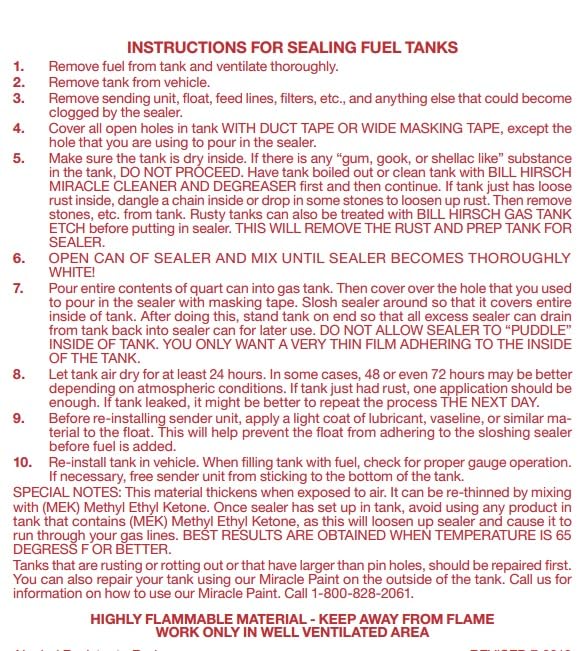
Before: If the tank has old failed sealer or coating inside, it should be removed with a coating stripping agent or sandblasting before starting the repair process.
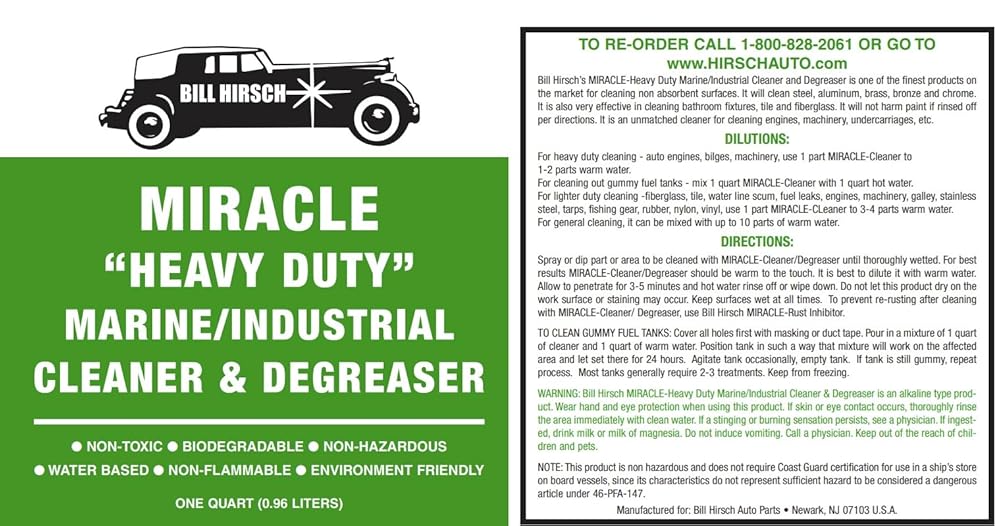
Step 1: Mix 1 quart Bill Hirsch Cleaner Degreaser with 1 quart of hot water. This solution will be used to remove any gum, varnish or sludge from the inside of the tank. Drain.
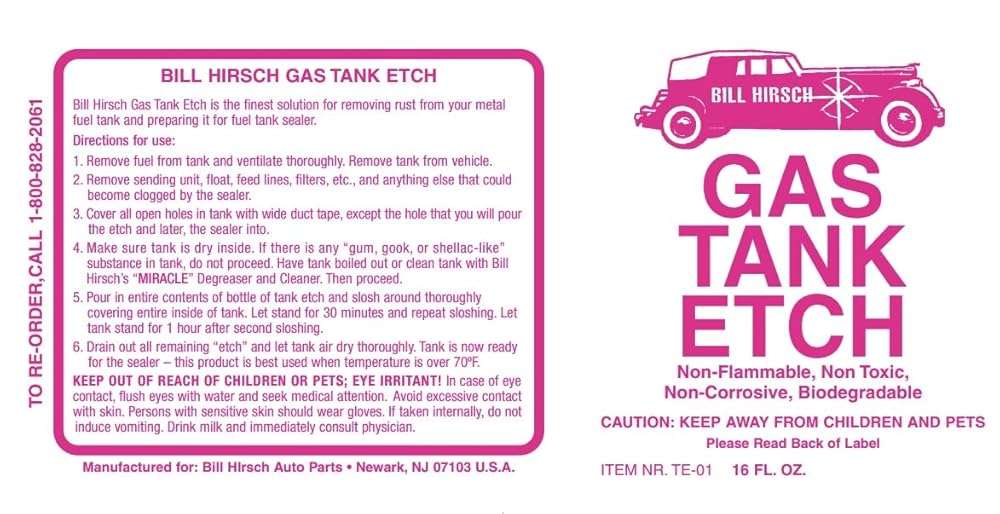
Step 2: Pour the entire bottle of Bill Hirsch Tank Etch to dissolve rust, coat the tank with zinc phosphate, and etch the metal for better adhesion of the sealer.
Step 3: After the tank is clean, drain the tank and rinse thoroughly with water. Let the tank dry. When totally dry, pour in the entire can of Bill Hirsch Tank Sealer.
Step 4: After all surfaces have been coated, drain the tank for about an hour to remove excess sealer from the tank.
 كوارت خزان الوقود كوارت
KWD 25
كوارت خزان الوقود كوارت
KWD 25
 منتجات سليك بخاخ لامع وواقي 17.35 أونصة سائلة. - طلاء شفاف عالي اللمعان متجدد من الفينيل، البلاستيك، المطاط، الحواف، الإطارات، السيارة، الشاحنة، الدراجة النارية، الدراجة الترابية (عبوتان)
KWD 12
منتجات سليك بخاخ لامع وواقي 17.35 أونصة سائلة. - طلاء شفاف عالي اللمعان متجدد من الفينيل، البلاستيك، المطاط، الحواف، الإطارات، السيارة، الشاحنة، الدراجة النارية، الدراجة الترابية (عبوتان)
KWD 12
 قطع غيار جنرال موتورز الأصلية 25982297 ختم هواء المبرد الجانبي للراكب
KWD 3.500
قطع غيار جنرال موتورز الأصلية 25982297 ختم هواء المبرد الجانبي للراكب
KWD 3.500
 لسيارة جيب باتريوت 2007-2017 ختم دعم المبرد | أقل | مطاط | بديل لـ CH1218131 | 191275806166, 5191257AA
KWD 28
لسيارة جيب باتريوت 2007-2017 ختم دعم المبرد | أقل | مطاط | بديل لـ CH1218131 | 191275806166, 5191257AA
KWD 28