PERFECT FIT FOR BEATS STUDIO 3 WIRELESS – Designed exclusively as a charging port replacement for Beats Studio 3 Wireless headphones suffering from not charging, slow charging, or loose USB port issues. Precision-engineered Micro USB charging board restores factory-level charging speed and connection stability. Note: NOT compatible with Studio 2, Solo 3, or other Beats models.
EVERYTHING YOU NEED INCLUDED – Kit includes: 1x Micro USB charging port board, precision screwdriver, pry tool, and step-by-step installation guide. An affordable, at-home headphone repair solution — no professional tools required. Get your headphones working like new in under 30 minutes.
BEST VALUE HEADPHONE REPAIR SOLUTION – Why replace your entire headset when one small part is all you need? This affordable charging port replacement for Beats Studio 3 gets your headphones working like new in under 30 minutes. Ideal for anyone whose Beats Studio 3 stopped charging, charges slowly, or shows an unstable connection.
OEM-GRADE QUALITY, PRE-TESTED & ESD PROTECTED – Every Micro USB charging board is manufactured to OEM specifications, individually tested before shipping, and packed in anti-static (ESD) protective packaging to prevent damage in transit. Engineered to restore original charging functionality and USB port stability — built to last.
1-YEAR WARRANTY – We stand behind every repair kit with a full 1-year warranty and hassle-free returns. Our responsive customer support team is available to guide you through installation step by step. Whether you're fixing your own headphones or helping a friend, this is the most reliable charging port repair kit for Beats Studio 3 on the market.
وصف
>How to repair:
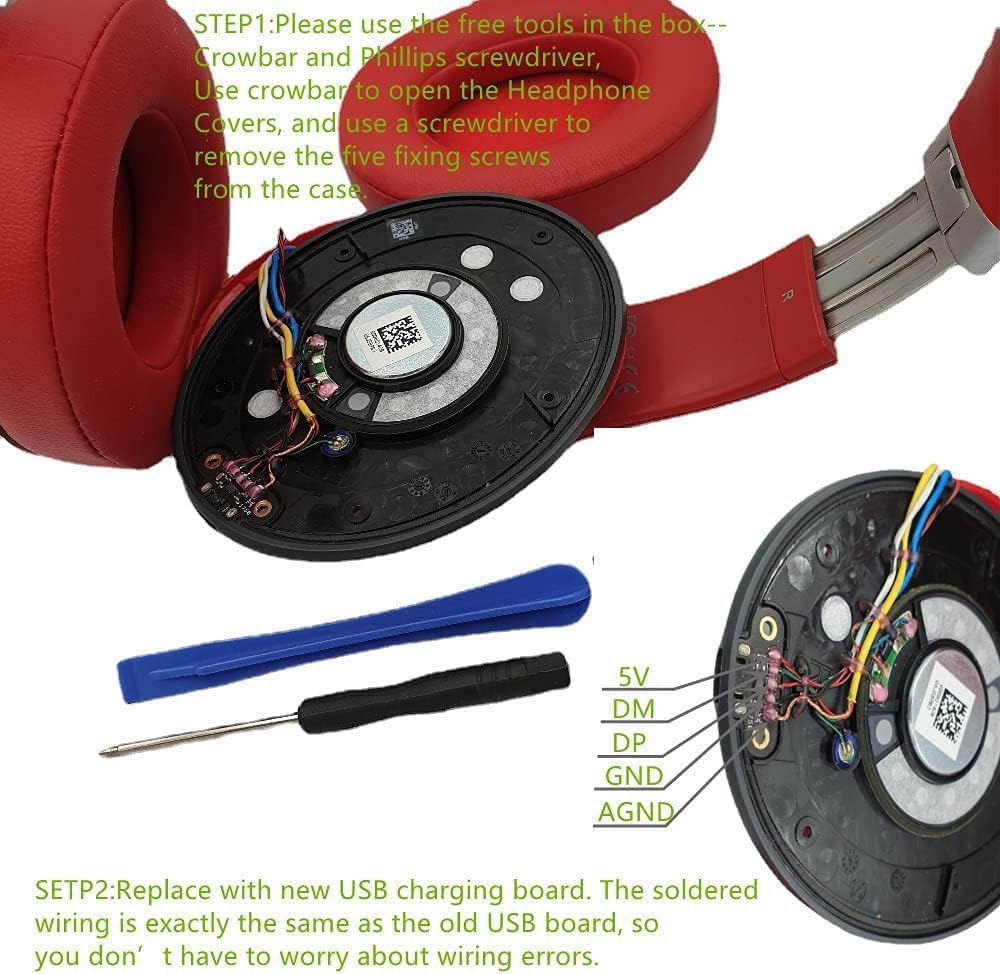
Step 1:Studio 3 Wireless Repair, Get Crowbar,Screwdriver (package included in)
Step 2: Use a crowbar to pry the headphone cover adhesive tape.
Step 3: Use a screwdriver to remove the 7 screws on the earphone shell.
Step 4: Remove the broken Headphone charging board from the Studio3 Wireless Noise Cancelling Over-Ear Headphones..
Step 5: Get the new Headphone charging board and use soldering iron to solder firmly.
Step 6: Install the shell and screws.
Step 7: Install back the headphone cover.
Step 8: Now everything is back to normal, charging---turn on the headphones and listen to the wonderful music.
 كيبل مرن بديل سي تي سي من كومسونما مع موصل اللوحة الام سامسونج جالكسي ايه 20 SM-A205U، كيبل مرن بمنفذ شحن، يتضمن ادوات
KWD 2.500
كيبل مرن بديل سي تي سي من كومسونما مع موصل اللوحة الام سامسونج جالكسي ايه 20 SM-A205U، كيبل مرن بمنفذ شحن، يتضمن ادوات
KWD 2.500
 مكبر صوت مدمج بديل من كومسونما لوحدة تحكم نينتندو سويتش ان اس سويتش مع مجموعة ادوات اصلاح من قطعتين
KWD 3.500
مكبر صوت مدمج بديل من كومسونما لوحدة تحكم نينتندو سويتش ان اس سويتش مع مجموعة ادوات اصلاح من قطعتين
KWD 3.500
 منفذ شحن USB بديل لجهاز سامسونج جالكسي تاب ايه (8 انش، 2019) SM-T290 SM-T295، منفذ سماعة رأس، ميكروفون بديل يتضمن مفك براغي
KWD 4
منفذ شحن USB بديل لجهاز سامسونج جالكسي تاب ايه (8 انش، 2019) SM-T290 SM-T295، منفذ سماعة رأس، ميكروفون بديل يتضمن مفك براغي
KWD 4
 -9%
مكبر صوت بديل لسماعات راس بيتس ستوديو 2، ستوديو 3، سولو 2، سولو 3، بوز كوايت كومفورت QC25 QC35 QC2 QC15 AC25 AC25 AC35 32 اوم 40 ملم (قطعتين)
KWD 5
-9%
مكبر صوت بديل لسماعات راس بيتس ستوديو 2، ستوديو 3، سولو 2، سولو 3، بوز كوايت كومفورت QC25 QC35 QC2 QC15 AC25 AC25 AC35 32 اوم 40 ملم (قطعتين)
KWD 5