- التسوق ، اصبح سهلا.
- /
- احصل على التطبيق!

1. How to place the debug cloth
- Place the debugging cloth in the center position in front and behind the car: the debugging cloth should be as parallel to the vehicle as possible, and ensure that the camera can fully capture the checkerboard pattern.
- Close to the tire edge: Some systems require the reference line of the debug cloth to align with the outside of the tire to ensure calibration accuracy.
- Left, front, right and back principle: Some brands recommend placing debugging cloths in the order of "left, front, right and back".
2. Debugging process
- Automatic debugging: Many 360 panoramic systems support automatic grabbing of reference points on debugging cloth to complete calibration.
- Manual fine-tuning: If the automatic calibration is not effective, you can manually adjust the reference point of each camera (such as the 12-point calibration method).
- Data input: Data such as vehicle length and vehicle width need to be measured and entered to optimize the splicing effect.
3. Factors influencing debugging cloth
- Flatness: If the debugging cloth is not flat, it may lead to splicing errors.
- Light conditions: High light or reflection may interfere with calibration. It is recommended to debug in an environment with uniform light.
- Site size: The ideal debugging site should be at least 314 in x 275 in to ensure sufficient calibration space.
 BY-J 77 جيجاهيرتز ملليمتر موجة رادار العمياء نظام الكشف عن البقع BSD BSA كشف النقطة العمياء ، مناسبة لشريط معدني SUV شاحنة
KWD 40.500
BY-J 77 جيجاهيرتز ملليمتر موجة رادار العمياء نظام الكشف عن البقع BSD BSA كشف النقطة العمياء ، مناسبة لشريط معدني SUV شاحنة
KWD 40.500
 بي-جي مصباح خلفي لرادار الدراجة، تنبيهات مرئية ومسموعة للمركبة الاقترابية، متوافق مع اجهزة الكمبيوتر والهواتف الذكية من جارمين واهو
KWD 36.500
بي-جي مصباح خلفي لرادار الدراجة، تنبيهات مرئية ومسموعة للمركبة الاقترابية، متوافق مع اجهزة الكمبيوتر والهواتف الذكية من جارمين واهو
KWD 36.500
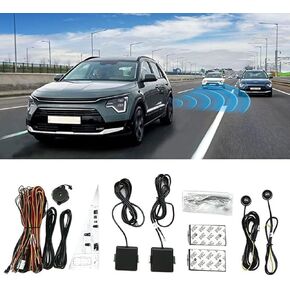 نظام الكشف عن البقع العمياء للسيارة من BY-J، مجموعة نظام مراقبة البقع العمياء بمستشعر موجة مليمتر 24 جيجا هرتز، تحذير عالمي لتغيير المسار لسيارات الدفع الرباعي والشاحنات RVs مع نظام وقوف الرادار العكسي
KWD 40.500
نظام الكشف عن البقع العمياء للسيارة من BY-J، مجموعة نظام مراقبة البقع العمياء بمستشعر موجة مليمتر 24 جيجا هرتز، تحذير عالمي لتغيير المسار لسيارات الدفع الرباعي والشاحنات RVs مع نظام وقوف الرادار العكسي
KWD 40.500
 -11%
مصباح يدوي صغير متعدد المهام LED، مصباح سلسلة مفاتيح قابل لإعادة الشحن، مصباح عمل صغير متعدد الوظائف COB، 500 لومن، 7 أوضاع إضاءة مع ولاعة كهربائية، قاطع حزام الأمان، مفك براغي، صافرة
KWD 4
-11%
مصباح يدوي صغير متعدد المهام LED، مصباح سلسلة مفاتيح قابل لإعادة الشحن، مصباح عمل صغير متعدد الوظائف COB، 500 لومن، 7 أوضاع إضاءة مع ولاعة كهربائية، قاطع حزام الأمان، مفك براغي، صافرة
KWD 4

