- Shopping, made easy.
- /
- Get the app!
Before beginning the installation process, be sure the wall is clean and dry. Do not stick on cold, wet, or recently painted walls. If so, wait for 3 to 5 weeks. First, remove the decal from the box and cut out the excess paper with scissors. Place a tape across the decal and stick it to the wall where you would like to place the decal. After deciding the position of the decal, start by folding the decal in half and slowly take the right side of the blank paper and peel it under a 180 degrees movement so it comes off easily and safely. Thus, leaving the decal on the transfer paper. While holding the transfer paper, use scissors to cut off the excess of the blank paper. Now, stretch the decal and stick the first half to the wall. With the first half completed, now you must remove the tape that was placed across the decal initially. Later, repeat the process with the other half. Press and run with a sturdy paddle, credit card, or thick sponge over the transfer paper. Starting from the center to the ends of the decal. Remove the bubbles and check if the corners have been stuck correctly to the wall. Finally, remove the transfer paper from the decal, and voila! Enjoy the new personality complement to your space with Adesiivo Studio!

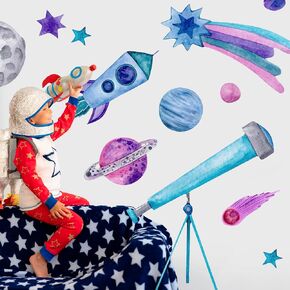 Outer Space Wall Decals Peel and Stick for Kids Wall Decals for Bedroom, Playroom Wall Decals, Wall Stickers for Living Room, Kids Wall Stickers, Kids Wall Decals
KWD 6.500
Outer Space Wall Decals Peel and Stick for Kids Wall Decals for Bedroom, Playroom Wall Decals, Wall Stickers for Living Room, Kids Wall Stickers, Kids Wall Decals
KWD 6.500
 Speedy Adventure Custom Name Wall Decal - Personalized Wall Stickers with Lightning Effects for Boys Room Decor - Energetic Bedroom Decor - Peel and Stick Name Decal for Kids Rooms
KWD 7
Speedy Adventure Custom Name Wall Decal - Personalized Wall Stickers with Lightning Effects for Boys Room Decor - Energetic Bedroom Decor - Peel and Stick Name Decal for Kids Rooms
KWD 7
 Big Clouds Wall Decals Removable for Kids Room Decoration 32 Clouds Large Vinyl Sticker Self Adhesive Wallpaper for Living Room Nursery Children Baby Kids Boys Girls Bedroom
KWD 4.500
Big Clouds Wall Decals Removable for Kids Room Decoration 32 Clouds Large Vinyl Sticker Self Adhesive Wallpaper for Living Room Nursery Children Baby Kids Boys Girls Bedroom
KWD 4.500
 2 Pack Mallard Duck Muslin Swaddle Blankets 70% Bamboo 30% Cotton Breathable Receiving Blankets Gender Neutral Newborn Essentials for Baby Boy or Girl Soft and Large 47 x 47 Inches (Mallard Duck)
KWD 8.500
2 Pack Mallard Duck Muslin Swaddle Blankets 70% Bamboo 30% Cotton Breathable Receiving Blankets Gender Neutral Newborn Essentials for Baby Boy or Girl Soft and Large 47 x 47 Inches (Mallard Duck)
KWD 8.500
![Rainbow Unicorn Wall Decals Peel and Stick for Kids Wall Decals for Bedroom, Playroom Wall Decals, Wall Stickers for Living Room, Kids Wall Stickers, Kids Wall Decals - [S] in Kuwait](https://cdn1.tilga.com/md/prod/3/9964/222116253.53218.jpg)
![Rainbow Unicorn Wall Decals Peel and Stick for Kids Wall Decals for Bedroom, Playroom Wall Decals, Wall Stickers for Living Room, Kids Wall Stickers, Kids Wall Decals - [S] in Kuwait](https://cdn1.tilga.com/md/prod/3/9964/222116255.39985.jpg)
![Rainbow Unicorn Wall Decals Peel and Stick for Kids Wall Decals for Bedroom, Playroom Wall Decals, Wall Stickers for Living Room, Kids Wall Stickers, Kids Wall Decals - [S] in Kuwait](https://cdn1.tilga.com/md/prod/3/9964/222116257.17082.jpg)
![Rainbow Unicorn Wall Decals Peel and Stick for Kids Wall Decals for Bedroom, Playroom Wall Decals, Wall Stickers for Living Room, Kids Wall Stickers, Kids Wall Decals - [S] in Kuwait](https://cdn1.tilga.com/md/prod/3/9964/222116259.6949.jpg)
![Rainbow Unicorn Wall Decals Peel and Stick for Kids Wall Decals for Bedroom, Playroom Wall Decals, Wall Stickers for Living Room, Kids Wall Stickers, Kids Wall Decals - [S] in Kuwait](https://cdn1.tilga.com/md/prod/3/9964/222116261.8459.jpg)
![Rainbow Unicorn Wall Decals Peel and Stick for Kids Wall Decals for Bedroom, Playroom Wall Decals, Wall Stickers for Living Room, Kids Wall Stickers, Kids Wall Decals - [S] in Kuwait](https://cdn1.tilga.com/md/prod/3/9964/222116263.48927.jpg)
![Rainbow Unicorn Wall Decals Peel and Stick for Kids Wall Decals for Bedroom, Playroom Wall Decals, Wall Stickers for Living Room, Kids Wall Stickers, Kids Wall Decals - [S] in Kuwait](https://cdn1.tilga.com/md/prod/3/9964/222116264.49413.jpg)