- التسوق ، اصبح سهلا.
- /
- احصل على التطبيق!
INSTRUCTIONS FOR REPLACEMENT SEAT COVERS
Tools Needed:
1.Small flat blade screwdriver/Needle Nose Pliers/Utility Knife
2.Power or manual Stapler
3.1/4" to 3/16"Staples
Removing the Old Seat Cover:
Most seat covers are stapled to the plastic seat base. To remove them, you'll need a small flathead screwdriver and a pair of needle-nose pliers.
1.Use the screwdriver to lift up each staple.
2.Grab the staples with the needle-nose pliers and pull them out.
3.Remove all the old staples and the original seat cover.
If your seat foam is damp, place it in the sun for a day or two to dry.
Finally, clean the seat base to prepare for installing the new cover.
Installing the New Seat Cover:
1.Warm Up the Cover: Place the new seat cover in the sun or a warm area for 15-30 minutes to make it more flexible.
2.Position the Cover: Lay the cover over the seat, making sure it's aligned correctly. Start at the front by centering the cover and wrapping it around the seat. Use 3-4 staples to hold it in place.
3.Secure the Back: Center the back of the seat and add 3-4 staples there. Then, pull the sides tight and staple 3-4 times on each side.
4.Adjust for Fit: Check how the cover fits. Focus on the tricky areas first by pulling the cover tight and stapling it down.Work out any wrinkles, and you might need to remove and redo some staples for a perfect fit. It can help to have a second person and be patient during this step.
5.Finish Up: Take your time to go around the cover until it fits nicely, ensuring it's stapled all the way around.
 LKV دراجة نارية المقود قفل مكافحة سرقة الفرامل قبضة خنق قفل الأزرق قابل للتعديل العالمي للدراجات سكوتر الدراجات ATV
KWD 6.500
LKV دراجة نارية المقود قفل مكافحة سرقة الفرامل قبضة خنق قفل الأزرق قابل للتعديل العالمي للدراجات سكوتر الدراجات ATV
KWD 6.500
 LKV دراجة نارية لوحة ترخيص قوس درابزين العالمي للدراجات النارية الخلفية درابزين مصباح ليد الحاجز مزيل عدة دراجة نارية لوحة ترخيص حامل
KWD 9.500
LKV دراجة نارية لوحة ترخيص قوس درابزين العالمي للدراجات النارية الخلفية درابزين مصباح ليد الحاجز مزيل عدة دراجة نارية لوحة ترخيص حامل
KWD 9.500
 LKV CNC أوتاد قدم الدراجة الترابية دواسات القدم للدراجات النارية باللون الأزرق متوافقة مع Sur Ron Light Bee S/X Segway X160 X260 CRF150F CRF230F KDX200 Talaria Sting MX3 MX4 XXX Taparia
KWD 9.500
LKV CNC أوتاد قدم الدراجة الترابية دواسات القدم للدراجات النارية باللون الأزرق متوافقة مع Sur Ron Light Bee S/X Segway X160 X260 CRF150F CRF230F KDX200 Talaria Sting MX3 MX4 XXX Taparia
KWD 9.500
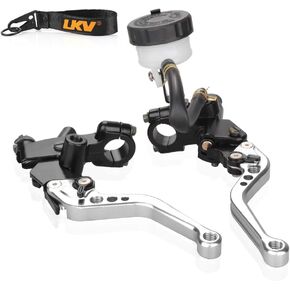 رافعة مضخة قابض فرامل الدراجة النارية LKV مع مجموعة خزان أسطوانة رئيسية هيدروليكية 7/8 بوصة 22 مم مكبس CNC عالمي متوافق مع Honda Yamaha Kawasaki سوزوكي من 250CC إلى 500CC
KWD 12
رافعة مضخة قابض فرامل الدراجة النارية LKV مع مجموعة خزان أسطوانة رئيسية هيدروليكية 7/8 بوصة 22 مم مكبس CNC عالمي متوافق مع Honda Yamaha Kawasaki سوزوكي من 250CC إلى 500CC
KWD 12