- التسوق ، اصبح سهلا.
- /
- احصل على التطبيق!
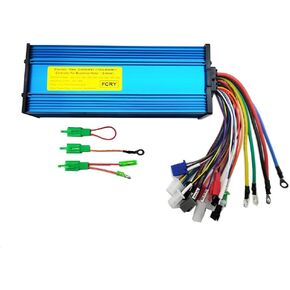
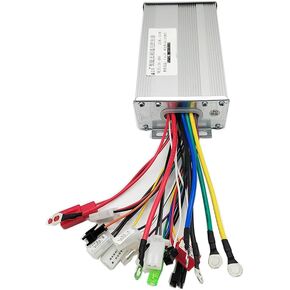
about controller:
voltage:36V/48V/52V/60V/72V universal
current:26A-33A
number of transistors: 9
rated power:500W-800W-1000W all can work
1.high -level brake
2.brake light power
3.throttle handle
4.reverse gear
5.low brake
6.hall (5wires)
7.linear brake(Thumb brake)
8.PAS
9.head light/tail light power
10.regenerative brake
11.intelligent recognition
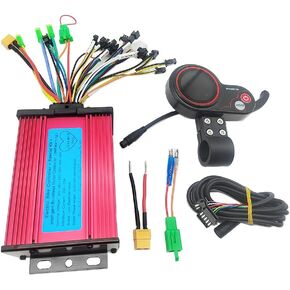
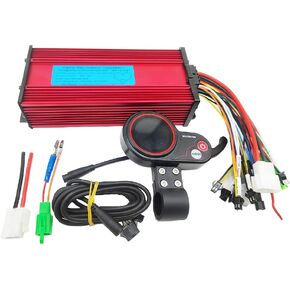
12.LCD
13.ignite
14.XT60 battery
15.phase line
how to connect ?
1.connect the phase line color to color connection
2.connect the hall line,color to color connection
3.connect the battery line(red wire :battery + , black:battery-)
4.connect the controller LCD line,connect the ignition switch(if your throttle not have ignition switch,controller ignition 2 wires need short together)
5.off power,let two intelligent recognition line connect together,open power,the wheel will forward or reverse.
(1.if wheel forward ,Separate the intelligent recognition line.
2.if wheel reverse, Separate the intelligent recognition line. let 2 intelligent recognition lines connect together again,if wheel forward ,Separate the intelligent recognition line.
3.This function allows the controller to intelligently identify the battery voltage and adjust the rotation direction of the motor)
NOTE:when use throttle,intelligent recognition must separate.)
6.other functions can be connected as needed.
LCD display communication protocol: UART
about introduction to LCD display parameters:
1.Working voltage: 36V,48V,52V,60V,72V (the default is 36V, the buyer can set the voltage value by himself)
Instrument 5-wire interface:
Red: Meter power cord
Blue: Power control wire of the controller
Black: instrument ground wire
Green: the data receiving line of the meter
Yellow: the data transmission line of the meter
2. Code Meaning:
E-06 Battery undervoltage
E-07 Motor failure,need check hall wires is 5 wires, is color to color connection?
E-08 throttle handle failure
E-09 Controller failure
E-10 Communication reception failure
E-11 Communication sending failure
E-12 BMS communication failure
E-13 Headlight failure
3. Settings
P01: Backlight brightness, level 0001 is the darkest, level 0003 is the brightest;
P02: mileage unit, 0000: KM; 0001: MILE;
P03: Voltage level:36V, 48V, 52V,60V,72V default 36V;
P04: Sleep time: 0, no sleep; other numbers are sleep time, range: 1-60; unit is minute;
P05: Power-assist gear: there are 3rd, 5th, and 9th gears adjustable;
P06: Wheel diameter: unit, inch; precision: 0.1;
P07: Number of speed measuring magnets: range: 1-255;
P08: Speed limit: the range is 0-100km/h, 100 means the maximum speed limit,
1. Communication status (controller control): The drive speed is maintained at the set value,
Error: ±1km/h; (both power assist and handlebar speed limit)
Note: The value here is based on kilometers. When the unit setting is converted from kilometers to miles,
The speed value on the display interface is automatically converted to the correct mile value, but this
The speed limit data set in the menu is not converted, which is inconsistent with the actual displayed mile speed limit value;
P09: Zero start, non-zero start setting, 0: zero start; 1: non-zero start;
P10: Drive mode setting 0000: Power-assisted drive (determine how much power is output by the power-assisted gear, at this time Handlebars are invalid).
0001 : Electric drive (drive through the handlebar, the booster gear is invalid at this time).
0002 : Power-assisted drive and electric drive coexist at the same time (electric drive zero start state invalid).
P11: boost sensitivity setting range: 1-24;
P12: Power-assisted start strength setting range: 1-5;
P13: Three types of power-assisted magnetic steel discs: 5, 8, and 12 magnets
P14: Default value, cannot be changed
P15: Default value, cannot be changed
P16: Default value, cannot be changed
P17: Default value, cannot be changed
P18: Default value, cannot be changed
Attention setting items: P01~P10 can be set, and it is not recommended to change the settings unless necessary.
For other settings on the instrument panel (P11~P18), you can take a look, but we suggest that you do not change them.
4. the button introduction:M is the power button
The key operation is divided into short press and long press, and combination key long press
Short press for quick/frequent actions like:
1. When riding, short press the up button or down button to modify the assist/speed gear;
2. Power button Switch the multi-function area to display data while riding, short press
Single button long press is mainly used for mode/switch state switching
Compound key (long press) is used for parameter setting, because the operation is complicated, which can reduce misoperation
(Short press does not make compound keys, because it is easy to trigger by mistake, and it is too difficult to operate)
Specific operation explanation:
1.If the current display is working, long press the power button, it will turn off the display, otherwise it will turn on the display
2. After the display screen is turned on, short press the M key to switch between display modes
3. Modify the assist ratio/electric gear
Assuming that it is currently in assist mode
1) Short press the up button, boost + 1
2) Short press the down button, boost - 1
4. Long press the power and up buttons to switch the display mode of speed.
5.Long press the up button to turn on or off the headlights.
6. Set parameters
Press and hold the up and down keys simultaneously to enter the parameter setting interface. The parameters that can be set include:
Wheel diameter (in inches), number of magnets, LCD brightness, undervoltage point, etc. (see settings: P01-P18);
In the settings interface, you can briefly press the up or down keys to increase or decrease the setting value. After modifying the parameters, it will flash. choice
After setting the value:
1. Short press the power button to switch to the next parameter while saving the set value of the previous parameter;
2. Alternatively, press and hold the up and down keys simultaneously to exit the settings and save the parameters. Otherwise, it will automatically exit and save the modified parameters after 10 seconds.
Note: Due to different production batches of products in different periods, some product parameters may differ slightly from those described in the manual, but it will not affect customer usage. Please do not mind.
 36V/48V/52V/60V/72V/84V 40A-50A 1500W-2000W-2500W العالمي فرش تحكم ل سكوتر كهربائي دراجة كهربائية
KWD 22.500
36V/48V/52V/60V/72V/84V 40A-50A 1500W-2000W-2500W العالمي فرش تحكم ل سكوتر كهربائي دراجة كهربائية
KWD 22.500
 دراجة كهربائية E-Scooter محرك BLDC 36V-48V 500W وحدة تحكم بدون فرشاة موجة مربعة
KWD 9
دراجة كهربائية E-Scooter محرك BLDC 36V-48V 500W وحدة تحكم بدون فرشاة موجة مربعة
KWD 9
 36 فولت 48 فولت 60 فولت 450 واط 500 واط 600 واط ذكي فرش مربع موجة تحكم مع شاشة الكريستال السائل للدراجة الكهربائية/سكوتر كهربائي/محرك بدون فرش
KWD 20.500
36 فولت 48 فولت 60 فولت 450 واط 500 واط 600 واط ذكي فرش مربع موجة تحكم مع شاشة الكريستال السائل للدراجة الكهربائية/سكوتر كهربائي/محرك بدون فرش
KWD 20.500
 ChongXiao 36V 48V 60V 1000W 1500W 1800W 34A 36A 40A فرش مربع موجة تحكم مع شاشة الكريستال السائل ل دراجة كهربائية سكوتر كهربائي
KWD 26.500
ChongXiao 36V 48V 60V 1000W 1500W 1800W 34A 36A 40A فرش مربع موجة تحكم مع شاشة الكريستال السائل ل دراجة كهربائية سكوتر كهربائي
KWD 26.500


