- التسوق ، اصبح سهلا.
- /
- احصل على التطبيق!
Operation Steps:
Pre-install:
First, route the coaxial cable through the vehicle's mounting hole before assembling the NMO connector.
Prepare components:
Slide the heat shrink tube and metal compression sleeve onto the cable in order. Do it before stripping the cable to avoid the exposed braided material getting stuck in the sleev.
Stripping:
Strip 13mm of the outer insulation jacket and fold the braided shield back.
Strip 6mm of the center conductor insulation.
Tip: Temporarily secure the folded braid with electrical tape to prevent fraying.
Crimping & Assembly:
Insert the center conductor fully into the pin slot of the NMO connector.
Slide the compression sleeve down to the base of the connector.
Crimp the sleeve securely using the dedicated crimping tool.
Sealing & Protection:
Heat the shrink tubing until it completely wraps around the curled area, ensuring waterproof sealing.
Installation & Testing:
Tighten the NMO base onto the vehicle mount.
Reinstall the antenna.
Use a multimeter to check for short circuits or open circuits.
Recommended: Verify SWR (Standing Wave Ratio) is
Performance Verification
Verify using a Vector Network Analyzer (or at minimum a 50MHz oscilloscope):
a) Signal attenuation ≤ 3dB/10m (at 144MHz VHF band)
b) VSWR ≤ 1.8:1 (at 430MHz UHF band)
Mechanical Test: Suspend a 5kg weight for 1 minute. Cable displacement should be
 جي جي جراند جراند "80722 حلقة معدنية دائرية من بلاستيك بي في سي مطاطية سوداء لمصباح ماركر 2 انش"
KWD 4
جي جي جراند جراند "80722 حلقة معدنية دائرية من بلاستيك بي في سي مطاطية سوداء لمصباح ماركر 2 انش"
KWD 4
 سلك شرف التخرج - ذهبي، حوالي 65.6 بوصة
KWD 2
سلك شرف التخرج - ذهبي، حوالي 65.6 بوصة
KWD 2
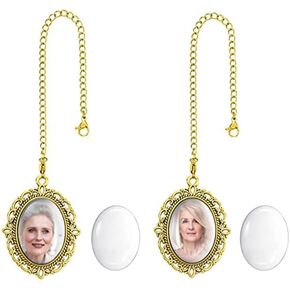 Gtwoilt Graduate Memorial Photo Charm 2pcs، شرابة تذكارية سحر زينة التخرج فئة 2023، المعلقات DIY Memory Mortarboard لقبعة التخرج
KWD 2.500
Gtwoilt Graduate Memorial Photo Charm 2pcs، شرابة تذكارية سحر زينة التخرج فئة 2023، المعلقات DIY Memory Mortarboard لقبعة التخرج
KWD 2.500
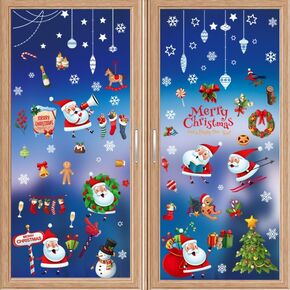 نافذة عيد الميلاد يتمسك بزينة ندفة الثلج، ملصقات نافذة ندفة الثلج اللامعة، ديكورات عجائب الشتاء المتلألئة لحفلة عيد الميلاد المنزلية
KWD 2.500
نافذة عيد الميلاد يتمسك بزينة ندفة الثلج، ملصقات نافذة ندفة الثلج اللامعة، ديكورات عجائب الشتاء المتلألئة لحفلة عيد الميلاد المنزلية
KWD 2.500


