- التسوق ، اصبح سهلا.
- /
- احصل على التطبيق!
12 digital input/output ports D2-D13
8 analog input ports A0-A7
A pair of TTL level serial transceiver ports RX/TX
6 PWM ports, D3, D5, D6, D9, D10, D11
Utilizes the Atmel Atmega328P-AU microcontroller
Supports USB download and power supply
Supports external 3.3V-12V DC power supply
Supports lithium battery and 9V battery power supply
Supports ISP download
Usage instructions:
1. Download the IDE:
Download link: [http://arduino.cc/en/Main/Software](http://arduino.cc/en/Main/Software) (Copy and open in browser)
2. Download the USB Chip Driver:
Download link (International):[http://www.wch-ic.com/download/list.asp?id=126](http://www.wch-ic.com/download/list.asp?id=126)
3. Connect the Nano Board: The driver will install automatically upon connecting the Nano development board.
4. In the IDE, Select the Board: Choose 'NANO'.
5. Select the COM Port:This can be found in 'My Computer', under the port your Uno development board is connected to.
6.Choose and Upload a Sample Program: Use an Arduino's built-in example program and upload it.
Package include:
8 x Nano V3.0 controller board
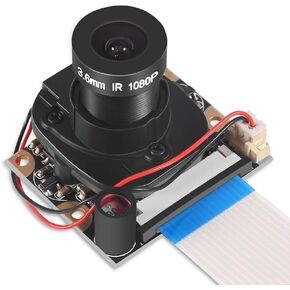 DORHEA Raspberry Pi 4 وحدة الكاميرا التلقائية IR-Cut Sensor Day/Night Vision Video Webcam HD 5MP 1080P OV5647 تركيز قابل للتعديل مع مستشعر الأشعة تحت الحمراء LED ضوء لـ Raspberry Pi 3 B+ 4B 2 Model B/B+ / A/A+
KWD 7
DORHEA Raspberry Pi 4 وحدة الكاميرا التلقائية IR-Cut Sensor Day/Night Vision Video Webcam HD 5MP 1080P OV5647 تركيز قابل للتعديل مع مستشعر الأشعة تحت الحمراء LED ضوء لـ Raspberry Pi 3 B+ 4B 2 Model B/B+ / A/A+
KWD 7
 Dorhea 2PCS IIC I2C TWI Serial LCD 2004 20x4 وحدة الإضاءة الخلفية الزرقاء مع محول واجهة I2C متوافق مع Raspberry Pi
KWD 5.500
Dorhea 2PCS IIC I2C TWI Serial LCD 2004 20x4 وحدة الإضاءة الخلفية الزرقاء مع محول واجهة I2C متوافق مع Raspberry Pi
KWD 5.500
 DORHEA 5 قطعة ESP32-WROVER ESP-32 ESP-32S ESP32 WROVER 4 ميجابايت واي فاي وحدة لاسلكية مع 32 ميجابايت PSRAM
KWD 4.500
DORHEA 5 قطعة ESP32-WROVER ESP-32 ESP-32S ESP32 WROVER 4 ميجابايت واي فاي وحدة لاسلكية مع 32 ميجابايت PSRAM
KWD 4.500
 لوحدة كاميرا Raspberry Pi Zero 160 FOV 5MP عدسة عين السمكة زاوية واسعة 160 درجة OV5647 1080P مستشعر كاميرا ويب فيديو عالية الدقة مع كابل صفر لطراز Raspberry Pi 4/3 B/B+ A+ RPi 2/1/صفر/صفر واط
KWD 7
لوحدة كاميرا Raspberry Pi Zero 160 FOV 5MP عدسة عين السمكة زاوية واسعة 160 درجة OV5647 1080P مستشعر كاميرا ويب فيديو عالية الدقة مع كابل صفر لطراز Raspberry Pi 4/3 B/B+ A+ RPi 2/1/صفر/صفر واط
KWD 7


